What Should I Know Before Drawing a Turkey? A Comprehensive Guide
Drawing a turkey, whether for Thanksgiving, a school project, or simply for the joy of art, can be a rewarding experience. However, diving in without some foundational knowledge can lead to frustration and a less-than-satisfying result. This comprehensive guide answers the question, *what should I know before drawing a turkey?*, equipping you with the essential information and techniques to create stunning turkey artwork. We’ll cover everything from understanding turkey anatomy and proportions to mastering shading and texture, ensuring your artistic journey is both enjoyable and successful. Our goal is to provide you with a resource that’s not just informative but deeply insightful, drawing upon years of artistic experience and observation to elevate your turkey drawing skills.
1. Understanding Turkey Anatomy and Proportions
Before even picking up a pencil, understanding the basic anatomy and proportions of a turkey is crucial. This isn’t about becoming a zoologist, but about developing an eye for the shapes and relationships that make a turkey a turkey. Without this foundation, your drawing might look…off.
Turkey’s Basic Body Structure
A turkey’s body can be simplified into a few key shapes: an oval for the body, a smaller circle for the head, and various shapes for the neck, legs, and tail. The neck is S-shaped, contributing to the turkey’s characteristic posture. The legs are relatively long and sturdy, and the tail is a fan-like structure composed of numerous feathers.
Proportional Relationships
The most common mistake beginners make is getting the proportions wrong. Here are some crucial relationships to keep in mind:
* **Head to Body Ratio:** The head should be significantly smaller than the body, typically around 1/4 to 1/6 the size of the body.
* **Neck Length:** The neck can be quite long, especially when the turkey is alert. It’s usually about the same length as the body itself, sometimes even longer when stretched.
* **Leg Length:** The legs should be long enough to support the body comfortably, usually around 1/2 to 2/3 the length of the body.
* **Tail Length:** The tail’s length can vary depending on the pose and the turkey’s display. However, it’s generally about the same length or slightly longer than the body.
Understanding these proportions will give your drawing a solid base. It’s helpful to sketch these basic shapes and lines before adding details.
Observational Exercises
The best way to internalize these proportions is through observation. Look at photographs of turkeys from different angles. Pay attention to how the shapes change depending on the perspective. Practice sketching these shapes and proportions until they become second nature. Even better, if you have the opportunity to see a real turkey, take the time to observe it carefully.
2. Essential Drawing Materials
While artistic talent is important, having the right tools can significantly impact the quality of your drawing. For drawing a turkey, you don’t need a vast array of materials, but a few essentials will make the process smoother and more enjoyable.
Pencils
A range of pencils is ideal for creating different values and textures. A set with pencils ranging from 2H (hard) to 6B (soft) will give you the most versatility. Harder pencils (2H-HB) are great for light sketching and detailed line work, while softer pencils (2B-6B) are perfect for shading and creating darker tones. Mechanical pencils are useful for very fine details.
Paper
Choose a paper that’s suitable for drawing. Smooth paper is good for detailed line work, while textured paper is better for shading and creating a more artistic effect. A medium-weight drawing paper is a good all-around choice.
Erasers
A good eraser is essential for correcting mistakes and creating highlights. A kneaded eraser is versatile and can be molded into different shapes for erasing small areas. A plastic or vinyl eraser is good for removing larger areas of pencil.
Blending Tools
Blending stumps, tortillons, or even cotton swabs can be used to blend pencil strokes and create smooth transitions in your shading. Your finger can also be used for blending, but be careful not to smudge the drawing too much.
Optional Materials
* **Ruler:** Useful for drawing straight lines, especially for the background or any geometric elements.
* **Sharpener:** Keep your pencils sharp for detailed work.
* **Drawing Board or Easel:** Provides a stable surface to work on.
3. Step-by-Step Guide to Drawing a Turkey
Now that you understand the basics of turkey anatomy and have your materials ready, let’s dive into a step-by-step guide to drawing a turkey.
Step 1: Basic Shapes and Proportions
Start by sketching the basic shapes of the turkey’s body, head, neck, legs, and tail. Use light pencil strokes so you can easily erase them later. Focus on getting the proportions right. Remember the head-to-body ratio, neck length, and leg length. The body should be a large oval, the head a smaller circle, and the neck an S-shaped curve.
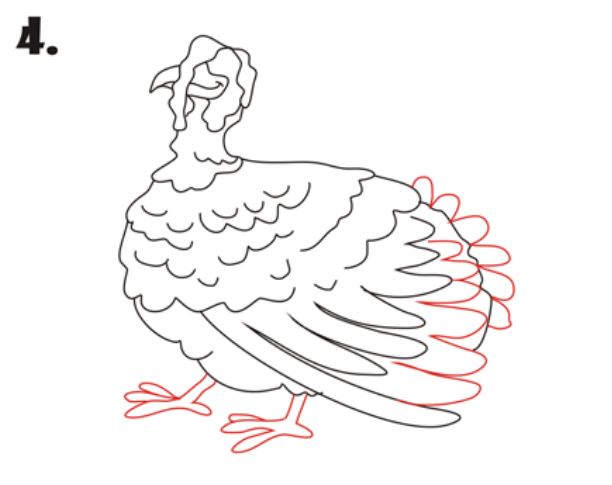
Step 2: Refining the Outline
Once you’re happy with the basic shapes and proportions, start refining the outline. Add more detail to the head, including the beak, wattle (the fleshy growth under the beak), and eyes. Shape the body and neck more accurately, paying attention to the turkey’s posture. Define the legs and feet, and sketch the general shape of the tail feathers.
Step 3: Adding Details
Now it’s time to add details to the turkey’s feathers. Start with the larger feathers on the body and tail, and then add smaller feathers to the neck and head. Pay attention to the direction and overlap of the feathers. Add details to the face, such as wrinkles around the eyes and texture to the beak and wattle. Define the legs and feet more clearly, adding details like scales and claws.
Step 4: Shading and Texture
Shading is what brings your drawing to life. Use a range of pencils to create different values and tones. Observe the light source and add shadows to the areas that are farthest from the light. Use blending tools to create smooth transitions between light and shadow. Add texture to the feathers by using short, overlapping strokes. Create texture on the legs and feet by adding small lines and dots.
Step 5: Final Touches
Once you’re happy with the shading and texture, add any final touches. Erase any unnecessary guidelines. Darken the lines in the areas where you want more emphasis. Add highlights by using an eraser to lift pencil from the paper. Step back and look at your drawing from a distance to see if there are any areas that need further refinement.
4. Understanding Feather Structure and Shading
Feathers are a defining characteristic of turkeys, and understanding their structure is key to drawing them realistically. Feathers aren’t just flat shapes; they have volume and texture. Shading plays a crucial role in conveying this. Here are key things to know:
* **Feather Layers:** Turkeys have multiple layers of feathers. The contour feathers cover the body and provide shape, while the down feathers underneath provide insulation. When drawing, consider how these layers interact.
* **Feather Direction:** Feathers grow in specific directions, overlapping like shingles on a roof. Pay attention to these directions to create a natural flow.
* **Shading for Volume:** Use shading to create the illusion of volume on each feather. The edges of the feathers will often be lighter, while the center will be darker, depending on the light source.
* **Texture:** Add texture to the feathers using short, overlapping strokes. Vary the pressure of your pencil to create different tones and textures.
Tips for Shading Feathers
* **Start Light:** Begin with light layers of shading and gradually build up the tones.
* **Use a Variety of Strokes:** Experiment with different pencil strokes to create different textures.
* **Pay Attention to Light Source:** The direction of the light source will determine where the shadows fall on the feathers.
* **Blend Carefully:** Use blending tools to create smooth transitions between light and shadow, but be careful not to over-blend.
5. Adding Personality and Character
While technical accuracy is important, adding personality and character to your turkey drawing can make it truly special. This is where your artistic interpretation comes into play.
Pose and Expression
The pose and expression of your turkey can convey a lot about its personality. Is it strutting proudly, pecking at the ground, or looking curiously at something? Consider the message you want to convey and choose a pose that reflects that.
Details and Accessories
Adding details and accessories can also enhance the personality of your turkey. Perhaps it’s wearing a hat, carrying a pumpkin, or surrounded by autumn leaves. These details can add context and tell a story.
Exaggeration and Stylization
Don’t be afraid to exaggerate certain features or stylize your drawing to create a more unique and expressive character. Maybe you want to make the tail feathers extra large and colorful, or give the turkey a mischievous grin. The possibilities are endless.
6. Common Mistakes to Avoid
Even experienced artists make mistakes. Knowing common pitfalls can help you avoid them and improve your drawing skills.
* **Incorrect Proportions:** As mentioned earlier, getting the proportions wrong is a common mistake. Double-check the head-to-body ratio, neck length, and leg length before adding details.
* **Flat Feathers:** Feathers have volume and texture. Avoid drawing them as flat, lifeless shapes. Use shading and texture to create the illusion of depth.
* **Lack of Detail:** Adding details is what brings your drawing to life. Don’t be afraid to spend time adding small details to the feathers, face, legs, and feet.
* **Over-Blending:** While blending can create smooth transitions, over-blending can make your drawing look muddy and lifeless. Use blending tools sparingly and focus on preserving the texture.
* **Ignoring the Light Source:** The light source is crucial for creating realistic shading. Pay attention to the direction of the light and add shadows accordingly.
7. Choosing a Drawing Style: Realistic vs. Cartoon
The style you choose will significantly impact the final look of your turkey drawing. Two popular styles are realistic and cartoon. Each has its own set of techniques and considerations.
Realistic Style
A realistic style aims to depict the turkey as accurately as possible. This requires a strong understanding of anatomy, proportions, and shading. Realistic drawings often include a high level of detail and texture. This is a great approach if you want to capture the true essence of the bird.
Cartoon Style
A cartoon style is more about exaggeration and simplification. Cartoon turkeys often have exaggerated features, such as large eyes, small bodies, and expressive faces. Cartoon drawings are typically less detailed and more stylized. This style allows for more creativity and humor.
8. Referencing Photos and Real-Life Models
Using reference photos or real-life models can be incredibly helpful when drawing a turkey. References provide valuable information about anatomy, proportions, and details. They can also inspire you with different poses and expressions. It’s always better to draw from reference than to rely solely on your imagination, especially when starting out.
Tips for Using References
* **Choose High-Quality Images:** Select images that are clear and well-lit.
* **Observe Carefully:** Pay attention to the details in the reference image.
* **Don’t Just Copy:** Use the reference as a guide, but don’t be afraid to add your own artistic interpretation.
* **Use Multiple References:** Look at multiple images from different angles to get a better understanding of the turkey’s form.
9. Tools & Software for Digital Turkey Drawing
While traditional pencil drawing is a timeless art form, digital drawing offers a unique set of advantages. Digital tools allow for easy corrections, experimentation, and sharing of your artwork. Here are some popular software options for drawing turkeys digitally:
* **Adobe Photoshop:** Industry-standard software for digital painting and editing.
* **Procreate:** A popular app for iPad, known for its intuitive interface and powerful features.
* **Clip Studio Paint:** A versatile software designed for drawing and painting, especially popular for comics and manga.
* **Autodesk Sketchbook:** A free software with a simple and user-friendly interface.
Essential Digital Drawing Tools
* **Drawing Tablet:** A drawing tablet allows you to draw directly on the screen using a stylus.
* **Stylus:** A stylus is a pen-like device used to draw on the tablet. Choose a stylus that feels comfortable in your hand and has pressure sensitivity.
* **Drawing Software:** Select a software that meets your needs and skill level.
10. Exploring Color and Mediums Beyond Pencil
While pencil drawing is a great starting point, there are many other mediums you can use to draw a turkey, each offering its own unique look and feel.
* **Colored Pencils:** Colored pencils allow you to add vibrant colors and create detailed textures.
* **Watercolor:** Watercolor creates soft, translucent effects and is great for creating atmospheric backgrounds.
* **Acrylic Paint:** Acrylic paint is versatile and can be used to create bold, opaque colors and textures.
* **Ink:** Ink is great for creating bold lines and dramatic contrasts.
Q&A: Your Turkey Drawing Questions Answered
Here are some frequently asked questions about drawing turkeys, designed to address common challenges and offer expert advice:
1. **Q: How do I make my turkey drawing look less flat?**
**A:** Focus on shading! Use a variety of pencil grades to create depth and dimension. Pay close attention to the light source and add shadows accordingly. Adding texture to the feathers and other details also helps.
2. **Q: What’s the best way to draw realistic-looking feathers?**
**A:** Observe real feathers closely. Notice how they overlap and curve. Use short, overlapping strokes to create texture. Vary the pressure of your pencil to create different tones and values.
3. **Q: How can I draw a turkey from different angles?**
**A:** Use reference photos from different angles. Pay attention to how the shapes and proportions change depending on the perspective. Practice sketching the basic shapes from various viewpoints.
4. **Q: What are some good ways to add personality to my turkey drawing?**
**A:** Experiment with different poses and expressions. Add details and accessories that reflect the turkey’s character. Don’t be afraid to exaggerate certain features or stylize your drawing.
5. **Q: How do I draw the wattle and snood realistically?**
**A:** Observe the texture and shape of the wattle and snood. Use short, irregular strokes to create the bumpy texture. Pay attention to the way the light falls on these features and add shadows accordingly.
6. **Q: What’s the best paper to use for drawing a turkey with colored pencils?**
**A:** A smooth paper is generally best for colored pencils, as it allows the colors to blend smoothly. Bristol paper is a good choice.
7. **Q: How can I prevent my pencil drawing from smudging?**
**A:** Use a fixative spray to protect your drawing from smudging. You can also place a sheet of tracing paper over your drawing while you’re working on it.
8. **Q: What’s the difference between a male and female turkey, and how does that affect my drawing?**
**A:** Male turkeys (toms) are typically larger and have more elaborate feathers than female turkeys (hens). Toms also have a larger wattle and snood. When drawing a male turkey, emphasize these features to make it more masculine.
9. **Q: How do I create a sense of movement in my turkey drawing?**
**A:** Use dynamic lines and poses to create a sense of movement. You can also add details that suggest motion, such as feathers blowing in the wind or the turkey’s legs in mid-stride.
10. **Q: What are some good resources for learning more about drawing turkeys?**
**A:** Look for tutorials on YouTube or art websites. Consider taking a drawing class or joining an online art community. Practice regularly and don’t be afraid to experiment.
Conclusion: Unleash Your Inner Artist and Draw a Majestic Turkey
Mastering the art of drawing a turkey requires a combination of knowledge, practice, and creativity. By understanding turkey anatomy, mastering essential drawing techniques, and exploring different styles and mediums, you can create stunning turkey artwork that captures the essence of these magnificent birds. Remember to observe carefully, practice regularly, and don’t be afraid to experiment. Drawing a turkey is not just about creating an image; it’s about expressing your artistic vision and celebrating the beauty of nature. So, grab your pencils, unleash your inner artist, and embark on a journey to draw a majestic turkey that you can be proud of. Share your masterpieces with us in the comments below! We’d love to see your take on “what should I know before drawing a turkey?”
