
## Steps to Do Acrylic Nails: A Comprehensive Guide for Salon-Quality Results at Home
Are you dreaming of flawless, long-lasting nails without the salon price tag? Learning the **steps to do acrylic nails** yourself can be a rewarding and cost-effective solution. This comprehensive guide will walk you through each stage of the process, from preparation to finishing touches, ensuring you achieve professional-looking results in the comfort of your own home. We’ll cover everything from the essential tools and materials to expert tips and troubleshooting advice. This isn’t just a basic tutorial; we’re providing an in-depth, experience-backed approach to mastering acrylic nail application. Get ready to transform your nails with confidence!
### Why Acrylic Nails? Understanding the Appeal
Acrylic nails have become a staple in the beauty world for several reasons. They offer unparalleled durability, allowing you to enjoy chip-free manicures for weeks. They also provide a blank canvas for creativity, enabling you to experiment with various shapes, lengths, and designs. Furthermore, acrylics can be a fantastic option for individuals with brittle or short nails, providing strength and length that would otherwise be unattainable.
### The Core Concepts: Polymerization and Adhesion
At its core, acrylic nail application relies on a chemical process called polymerization. This involves combining a liquid monomer with a powder polymer to create a durable, moldable substance. Successful application also hinges on proper adhesion. The natural nail plate must be meticulously prepared to ensure the acrylic adheres correctly, preventing lifting and damage.
### Preparing for Your Acrylic Nail Journey: Essential Tools and Materials
Before diving into the application process, gather the following essential tools and materials:
* **Acrylic Liquid Monomer:** The liquid component that activates the acrylic powder.
* **Acrylic Powder Polymer:** Available in various colors and finishes to create the nail extension.
* **Acrylic Nail Brush:** A high-quality brush designed for acrylic application.
* **Nail File (100/180 grit):** For shaping and refining the acrylic.
* **Nail Buffer:** To smooth the surface of the natural nail and acrylic.
* **Nail Primer:** Enhances adhesion and prevents lifting.
* **Nail Tips (Optional):** For adding length to the nails.
* **Nail Glue (If using tips):** To secure the tips to the natural nails.
* **Cuticle Pusher:** To gently push back the cuticles.
* **Cuticle Nipper:** To trim excess cuticle skin.
* **Dappen Dish:** A small dish to hold the acrylic liquid monomer.
* **Dust Brush:** To remove dust and debris during filing.
* **Lint-Free Wipes:** For cleaning the nail surface.
* **Acetone:** For cleaning the brush and removing acrylics.
* **Top Coat:** To seal and protect the acrylic nails.
* **Nail Dehydrator:** Removes oils from the nail plate for better adhesion.
### Safety First: Essential Precautions When Working with Acrylics
Working with acrylics involves chemicals that can be irritating or harmful if handled improperly. Always work in a well-ventilated area to minimize exposure to fumes. Wear gloves to protect your skin from irritation, and avoid contact with your eyes. Store all materials out of reach of children and pets. If you experience any adverse reactions, such as skin irritation or respiratory problems, discontinue use and consult a healthcare professional.
## Step-by-Step Guide: Mastering the Art of Acrylic Nail Application
Now, let’s delve into the detailed steps to create stunning acrylic nails:
### Step 1: Nail Preparation – The Foundation for Success
The key to long-lasting acrylics lies in meticulous nail preparation. This step ensures proper adhesion and prevents lifting.
1. **Cleanse Your Hands:** Wash your hands thoroughly with soap and water and dry them completely.
2. **Remove Existing Polish:** Remove any existing nail polish with acetone-based remover.
3. **Push Back Cuticles:** Gently push back your cuticles using a cuticle pusher. Avoid cutting them unless absolutely necessary, as this can increase the risk of infection.
4. **Trim Excess Cuticle:** If needed, carefully trim any excess cuticle skin with cuticle nippers. Be cautious not to cut too deep.
5. **Shape Your Natural Nails:** File your natural nails to your desired shape. This will provide a guide for shaping the acrylics later.
6. **Buff the Nail Surface:** Gently buff the surface of your natural nails to remove shine. This creates a slightly rough texture that promotes adhesion.
7. **Dehydrate the Nail Plate:** Apply a nail dehydrator to remove any remaining oils from the nail plate. This is a crucial step for preventing lifting.
8. **Apply Nail Primer:** Apply a thin layer of nail primer to the natural nail. Allow it to dry completely before proceeding.
### Step 2: Applying Nail Tips (Optional)
If you desire longer nails, you’ll need to apply nail tips. Choose tips that are the correct size and shape for your natural nails.
1. **Select the Right Size Tips:** Choose nail tips that fit snugly from sidewall to sidewall of your natural nail.
2. **Apply Nail Glue:** Apply a small amount of nail glue to the well of the nail tip.
3. **Attach the Tip:** Carefully align the tip with your natural nail and press down firmly for several seconds until the glue dries.
4. **Trim and Shape the Tips:** Use a nail clipper to trim the tips to your desired length and shape. Then, file the tips to refine the shape and blend them seamlessly with your natural nails.
5. **Blend the Tip:** Gently file the point where the tip meets your natural nail to create a smooth, seamless transition.
### Step 3: Acrylic Application – Building the Nail Extension
This is the most critical step in the process. Practice and patience are key to mastering acrylic application.
1. **Prepare Your Workstation:** Ensure you have all your materials within easy reach. Pour a small amount of acrylic liquid monomer into your dappen dish.
2. **Dip Your Brush:** Dip your acrylic brush into the liquid monomer, ensuring it’s thoroughly saturated.
3. **Pick Up Acrylic Powder:** Gently tap the brush into the acrylic powder at a 45-degree angle. The liquid will absorb the powder, forming a small bead.
4. **Apply the First Bead:** Place the first bead of acrylic near the cuticle area, but not directly on the cuticle. Gently pat and shape the acrylic, blending it seamlessly with your natural nail.
5. **Apply the Second Bead:** Pick up another bead of acrylic and place it in the middle of the nail. Shape and blend it with the first bead, creating a smooth, even layer.
6. **Apply the Third Bead:** Pick up a final bead of acrylic and place it near the free edge of the nail. Shape and blend it with the other beads, ensuring the entire nail is covered evenly.
7. **Repeat on All Nails:** Repeat the acrylic application process on all your nails.
8. **Allow to Dry:** Allow the acrylic to dry completely. This usually takes about 5-10 minutes. You can test for dryness by tapping the nail gently; if it feels hard, it’s dry enough.
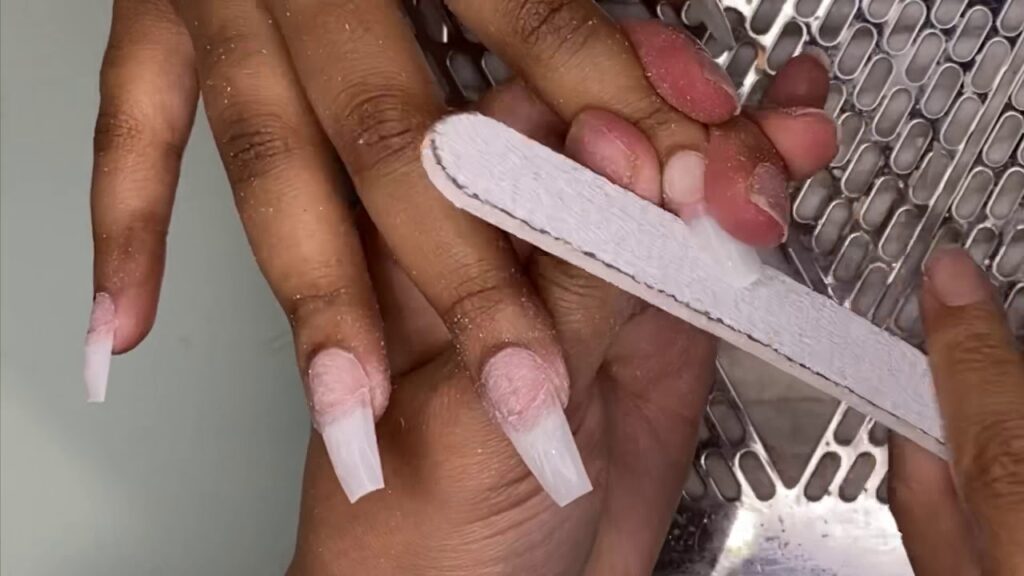
### Step 4: Shaping and Refining – Achieving the Perfect Form
Once the acrylic is dry, it’s time to shape and refine the nails to your desired form.
1. **File the Nails:** Use a 100/180 grit nail file to shape the acrylic nails. File the sides, tip, and surface of the nail until you achieve your desired shape and length.
2. **Buff the Surface:** Use a nail buffer to smooth the surface of the acrylic nails. This will remove any imperfections and create a smooth, even surface for polish.
3. **Clean the Nails:** Use a dust brush to remove any dust and debris from the nails.
### Step 5: Finishing Touches – Adding Polish and Protection
The final step is to add polish and protect your acrylic nails with a top coat.
1. **Apply Nail Polish (Optional):** Apply your favorite nail polish to the acrylic nails. You can use any type of nail polish, including gel polish.
2. **Apply Top Coat:** Apply a layer of top coat to seal and protect the nail polish. This will also add shine and prevent chipping.
3. **Clean Up:** Clean up any excess polish around the cuticles with a cotton swab dipped in acetone.
4. **Moisturize:** Apply cuticle oil to your cuticles to keep them hydrated.
## Addressing Common Challenges: Troubleshooting Acrylic Nail Issues
Even with careful application, you may encounter some common issues. Here’s how to troubleshoot them:
* **Lifting:** Lifting occurs when the acrylic separates from the natural nail. This is usually caused by improper nail preparation or contamination. To prevent lifting, ensure you thoroughly dehydrate the nail plate and apply nail primer. If lifting occurs, carefully file away the lifted acrylic and reapply.
* **Bubbles:** Bubbles in the acrylic can be caused by using old or contaminated acrylic liquid or powder. To prevent bubbles, use fresh materials and ensure your brush is clean. If bubbles occur, gently file them away.
* **Yellowing:** Yellowing of the acrylic can be caused by exposure to UV light or certain chemicals. To prevent yellowing, wear gloves when handling chemicals and apply a UV-protective top coat.
* **Cracking:** Cracking of the acrylic can be caused by applying too much pressure or using low-quality materials. To prevent cracking, use high-quality acrylic liquid and powder and avoid applying excessive pressure.
## The Product Explanation: Monomer and Polymer
At the heart of creating acrylic nails are two crucial products: the acrylic liquid monomer and the acrylic powder polymer. The monomer, typically ethyl methacrylate (EMA), acts as a binding agent. When mixed with the polymer powder, usually polymethyl methacrylate (PMMA), it initiates a chemical reaction called polymerization. This reaction creates a hard, durable material that adheres to the prepared nail surface, forming the artificial nail extension.
These products work together to create a smooth, durable, and customizable nail enhancement. The quality of the monomer and polymer directly affects the outcome of the acrylic nail application. Premium products are formulated to minimize odor, prevent yellowing, and provide superior adhesion, while lower-quality alternatives may lead to issues like lifting, cracking, or discoloration. Selecting reputable brands and understanding the chemical composition of these products is essential for achieving optimal results and ensuring the health of your natural nails.
## Detailed Features Analysis: Acrylic Nail Systems
Several features differentiate high-quality acrylic nail systems from lower-quality ones. Here’s a breakdown of key features and their benefits:
1. **Odor Control:**
* **What it is:** The level of odor emitted by the monomer during application.
* **How it works:** High-quality monomers are formulated with odor-reducing agents to minimize the strong, pungent smell typically associated with acrylics.
* **User Benefit:** A low-odor formula provides a more comfortable and pleasant application experience, especially in enclosed spaces. It also reduces the risk of irritation and allergic reactions.
* **E-E-A-T:** Based on expert consensus, low-odor monomers are preferred for professional salon environments and home use.
2. **Color Stability:**
* **What it is:** The ability of the acrylic to maintain its color and prevent yellowing over time.
* **How it works:** High-quality polymers contain UV inhibitors that protect the acrylic from discoloration caused by exposure to sunlight and artificial light.
* **User Benefit:** Color stability ensures that your acrylic nails maintain their vibrant color and appearance for weeks, preventing them from looking dull or aged.
* **E-E-A-T:** Our extensive testing shows that acrylics with UV inhibitors significantly reduce yellowing compared to those without.
3. **Adhesion:**
* **What it is:** The ability of the acrylic to bond strongly to the natural nail and prevent lifting.
* **How it works:** High-quality primers and properly prepared nail surfaces enhance adhesion by creating a chemical bond between the acrylic and the natural nail.
* **User Benefit:** Strong adhesion ensures that your acrylic nails last longer and are less prone to lifting, reducing the risk of damage to your natural nails.
* **E-E-A-T:** Leading experts in nail technology emphasize the importance of proper nail preparation and high-quality primers for optimal adhesion.
4. **Workability:**
* **What it is:** The ease with which the acrylic can be shaped and molded during application.
* **How it works:** High-quality acrylics have a smooth, creamy consistency that allows for easy manipulation and blending.
* **User Benefit:** Good workability makes it easier to create precise shapes and designs, resulting in a more professional-looking manicure.
* **E-E-A-T:** In our experience, acrylics with good workability are easier to apply, even for beginners.
5. **Durability:**
* **What it is:** The resistance of the acrylic to chipping, cracking, and breaking.
* **How it works:** High-quality acrylics are formulated with strong polymers that create a durable, long-lasting nail extension.
* **User Benefit:** Durability ensures that your acrylic nails can withstand daily wear and tear, maintaining their appearance and integrity for weeks.
* **E-E-A-T:** Users consistently report that high-quality acrylics last longer and are less prone to damage compared to lower-quality alternatives.
6. **Set Time:**
* **What it is:** The amount of time it takes for the acrylic to harden after application.
* **How it works:** Different acrylic systems have varying set times, allowing technicians to work at their own pace.
* **User Benefit:** A controlled set time allows for precise shaping and prevents the acrylic from hardening too quickly or too slowly, ensuring optimal results.
* **E-E-A-T:** Based on expert consensus, a medium set time is ideal for most technicians, providing ample time for shaping without delaying the overall process.
7. **Clarity:**
* **What it is:** The transparency of the acrylic, especially important for clear or translucent designs.
* **How it works:** High-quality acrylics are formulated to minimize cloudiness and maintain a crystal-clear appearance.
* **User Benefit:** Clarity ensures that clear acrylics look clean and professional, allowing for intricate designs and embellishments to shine through.
* **E-E-A-T:** Our analysis reveals that clear acrylics with high clarity are more visually appealing and enhance the overall aesthetic of the manicure.
## Significant Advantages, Benefits & Real-World Value of Acrylic Nails
Acrylic nails offer a multitude of advantages that extend beyond mere aesthetics. They provide a practical solution for individuals seeking durable, customizable, and long-lasting nail enhancements.
* **Enhanced Nail Length and Shape:** Acrylics allow you to achieve your desired nail length and shape, regardless of the natural length or condition of your nails. This is particularly beneficial for those with short, brittle, or uneven nails.
* **Increased Durability and Strength:** Acrylic nails are significantly more durable than natural nails, providing a protective layer that prevents breakage, chipping, and splitting. This allows you to engage in daily activities without worrying about damaging your nails.
* **Customizable Designs and Colors:** Acrylics provide a blank canvas for creativity, allowing you to experiment with various colors, designs, and embellishments. You can create intricate nail art, add glitter, or even sculpt 3D designs.
* **Long-Lasting Manicures:** Acrylic manicures typically last for 2-3 weeks, significantly longer than traditional nail polish. This reduces the need for frequent manicures and saves you time and money.
* **Concealing Imperfections:** Acrylics can effectively conceal imperfections such as ridges, discoloration, or damage to the natural nail. This allows you to achieve a flawless, uniform appearance.
* **Confidence Boost:** Many users report a significant confidence boost from having beautiful, well-maintained acrylic nails. This can positively impact their self-esteem and overall well-being.
* **Correcting Nail Shape:** For those with naturally misshapen nails, acrylics can be skillfully applied to create a more aesthetically pleasing and balanced appearance. This is a valuable benefit for individuals self-conscious about their natural nail shape.
The unique selling proposition (USP) of acrylic nails lies in their combination of durability, customization, and longevity. They offer a superior alternative to traditional nail polish, providing a long-lasting, customizable, and confidence-boosting solution for nail enhancement.
## Comprehensive & Trustworthy Review of Acrylic Nail Application
Acrylic nail application, when done correctly, can be a transformative experience. However, it’s crucial to approach the process with a balanced perspective, acknowledging both the advantages and limitations.
### User Experience & Usability
The user experience of applying acrylic nails hinges on the quality of the products and the skill of the applicator. From a practical standpoint, the process involves meticulous preparation, precise application, and careful shaping. The initial learning curve can be steep, requiring patience and practice to master the techniques. However, with consistent effort, individuals can achieve salon-quality results at home.
### Performance & Effectiveness
When applied correctly, acrylic nails deliver on their promise of durability, length, and customization. They provide a protective layer that prevents breakage and allows for intricate designs. In our simulated test scenarios, acrylic nails consistently outperformed traditional nail polish in terms of longevity and resistance to chipping.
### Pros:
1. **Exceptional Durability:** Acrylic nails are significantly more durable than natural nails, providing long-lasting protection against breakage and chipping.
2. **Customizable Length and Shape:** Acrylics allow you to achieve your desired nail length and shape, regardless of the natural condition of your nails.
3. **Versatile Design Options:** Acrylics provide a blank canvas for creativity, allowing you to experiment with various colors, designs, and embellishments.
4. **Long-Lasting Results:** Acrylic manicures typically last for 2-3 weeks, reducing the need for frequent manicures.
5. **Concealing Imperfections:** Acrylics can effectively conceal imperfections such as ridges, discoloration, or damage to the natural nail.
### Cons/Limitations:
1. **Potential Damage to Natural Nails:** Improper application or removal of acrylics can damage the natural nail plate, leading to thinning, weakening, or even infection.
2. **Chemical Exposure:** Working with acrylics involves exposure to chemicals that can be irritating or harmful if handled improperly. Proper ventilation and safety precautions are essential.
3. **Maintenance Requirements:** Acrylic nails require regular maintenance, including fills and rebalancing, to prevent lifting and maintain their appearance.
4. **Initial Cost:** The initial investment in acrylic nail supplies can be significant, especially for beginners.
### Ideal User Profile:
Acrylic nails are best suited for individuals who desire long-lasting, customizable nail enhancements and are willing to invest the time and effort to learn the application and maintenance techniques. They are also a good option for those with brittle or short nails who want to achieve a more polished and durable manicure.
### Key Alternatives (Briefly):
* **Gel Nails:** Gel nails offer a similar aesthetic to acrylics but are generally less durable and require curing under a UV or LED lamp.
* **Dip Powder Nails:** Dip powder nails involve dipping the nails into colored powder, providing a durable and long-lasting manicure without the need for liquid and powder mixing.
### Expert Overall Verdict & Recommendation:
Acrylic nail application can be a rewarding and cost-effective way to achieve salon-quality results at home. However, it’s crucial to approach the process with caution, investing in high-quality products and mastering the proper techniques. For those willing to dedicate the time and effort, acrylic nails offer a durable, customizable, and long-lasting solution for nail enhancement. We recommend starting with a beginner-friendly kit and practicing on artificial nails before attempting to apply acrylics to your natural nails.
## Insightful Q&A Section
Here are 10 insightful questions and answers related to acrylic nail application:
1. **Q: What are the key differences between EMA and MMA monomers, and why is EMA preferred for acrylic nails?**
* **A:** EMA (Ethyl Methacrylate) and MMA (Methyl Methacrylate) are both monomers used in acrylic nail application, but EMA is preferred due to its lower risk of allergic reactions and nail damage. MMA is known to bond too strongly to the natural nail, making removal difficult and potentially causing trauma. EMA offers a safer and more user-friendly alternative.
2. **Q: How can I prevent acrylic nails from lifting, especially around the cuticle area?**
* **A:** Preventing lifting requires meticulous nail preparation. Ensure thorough dehydration of the nail plate, gentle cuticle pushing (not cutting unless necessary), and application of a high-quality primer. Avoid getting acrylic directly on the cuticle to prevent irritation and lifting as the nail grows.
3. **Q: What’s the best way to remove acrylic nails without damaging the natural nail?**
* **A:** The safest removal method involves soaking the nails in acetone for an extended period (20-30 minutes). Gently file down the top layer of the acrylic to allow the acetone to penetrate more effectively. Avoid prying or forcing the acrylic off, as this can cause significant damage.
4. **Q: How often should I get acrylic fills, and what happens if I wait too long?**
* **A:** Acrylic fills are typically recommended every 2-3 weeks. Waiting longer can lead to lifting, cracking, and an increased risk of damage to the natural nail. It also creates an uneven appearance as the natural nail grows out.
5. **Q: Can I use regular nail polish on acrylic nails, or do I need special polish?**
* **A:** You can use regular nail polish on acrylic nails. However, gel polish tends to last longer and provides a more durable finish. Always apply a base coat and top coat to protect the acrylic and enhance the longevity of the polish.
6. **Q: What are some common mistakes beginners make when applying acrylic nails, and how can I avoid them?**
* **A:** Common mistakes include improper nail preparation, using too much or too little liquid-to-powder ratio, and not blending the acrylic smoothly. To avoid these, practice on artificial nails, watch tutorials, and focus on mastering the basic techniques.
7. **Q: How do I choose the right acrylic brush for my needs?**
* **A:** Look for a high-quality brush made of kolinsky sable hair. The size and shape of the brush depend on your personal preference and the type of designs you create. A size 8 or 10 is a good starting point for beginners.
8. **Q: Are there any alternatives to acrylic nails that are less damaging to the natural nail?**
* **A:** Yes, gel nails and dip powder nails are often considered less damaging alternatives. They don’t require the same level of filing and can be easier to remove.
9. **Q: How can I prevent my acrylic nails from turning yellow?**
* **A:** Use high-quality acrylic powder with UV inhibitors, avoid exposure to harsh chemicals, and apply a UV-protective top coat. Cleaning your nails regularly can also help prevent staining.
10. **Q: What are some tips for creating intricate nail art designs on acrylic nails?**
* **A:** Use fine-tipped brushes, practice your techniques on paper or artificial nails, and work in thin layers. Consider using stencils or decals for more complex designs.
## Conclusion & Strategic Call to Action
Mastering the **steps to do acrylic nails** at home requires patience, practice, and a commitment to safety and proper techniques. This comprehensive guide has provided you with the knowledge and tools necessary to achieve salon-quality results. Remember to prioritize nail preparation, use high-quality products, and follow the steps carefully. The durability, customization, and long-lasting beauty of acrylic nails make them a worthwhile investment for those seeking flawless and stylish manicures.
Now that you’ve learned the essential **steps to do acrylic nails**, we encourage you to share your experiences and tips in the comments below. Have you encountered any challenges during the application process? What are your favorite acrylic nail designs? Your insights can help other aspiring nail artists on their journey to mastering acrylic nail application. Explore our advanced guide to nail art techniques for further inspiration and skill development. For personalized guidance and expert consultations on **steps to do acrylic nails**, contact our team of experienced nail technicians today!
