## The Ultimate Guide: How to Attach a Trellis to a Fence for a Stunning Garden Display
Are you dreaming of cascading flowers, climbing vines, or a vibrant vertical garden, but your yard lacks the support structure? Attaching a trellis to a fence is the perfect solution. This comprehensive guide will provide you with everything you need to know about how to **attach a trellis to a fence** securely and beautifully, transforming your outdoor space into a flourishing oasis. We’ll cover the best methods, materials, and considerations to ensure a long-lasting and visually appealing result. Whether you’re a seasoned gardener or a DIY novice, you’ll find the expert guidance you need to succeed. This guide goes beyond simple instructions; we’ll delve into the nuances of trellis design, fence compatibility, and long-term maintenance, offering a level of detail you won’t find anywhere else. Get ready to elevate your garden with our expert advice!
## Understanding Trellises and Fences: A Foundation for Success
Before diving into the attachment process, let’s establish a solid understanding of trellises and fences. This knowledge will help you make informed decisions and avoid common pitfalls. Choosing the right trellis and ensuring compatibility with your fence are crucial for a successful and aesthetically pleasing outcome.
### What is a Trellis?
A trellis is a framework, typically made of wood, metal, or plastic, used to support climbing plants. Trellises come in various shapes, sizes, and designs, from simple lattice panels to elaborate, freestanding structures. The primary function of a trellis is to provide vertical support for plants that naturally climb or vine. This allows them to grow upwards, maximizing sunlight exposure and creating a visually appealing display.
### Types of Trellises:
* **Lattice Trellises:** These are the most common type, featuring a grid-like pattern of interwoven strips. They are versatile and suitable for a wide range of climbing plants.
* **Fan Trellises:** Shaped like a fan, these trellises provide a decorative and supportive structure for plants that spread outwards.
* **Obelisk Trellises:** Tall, slender structures with a pointed top, obelisk trellises add a touch of elegance to any garden.
* **A-Frame Trellises:** Two panels hinged together at the top, forming an A-shape. These are often used for heavier plants like cucumbers or beans.
* **Metal Trellises:** Constructed from wrought iron, steel, or aluminum, metal trellises offer durability and a contemporary look.
### Understanding Your Fence
The type of fence you have will significantly impact the method you use to **attach a trellis to a fence**. Consider the material, height, and structural integrity of your fence before proceeding.
### Common Fence Types:
* **Wood Fences:** These are the most common type, offering privacy and a natural aesthetic. Wood fences can be made from various types of wood, such as cedar, pine, or redwood.
* **Chain-Link Fences:** Durable and affordable, chain-link fences are often used for security purposes. However, they can be less aesthetically pleasing than other types of fences.
* **Vinyl Fences:** Low-maintenance and weather-resistant, vinyl fences are a popular choice for homeowners. They come in a variety of styles and colors.
* **Wrought Iron Fences:** Elegant and durable, wrought iron fences add a touch of sophistication to any property. They are often used for decorative purposes.
* **Composite Fences:** Made from a blend of wood fibers and plastic, composite fences offer the look of wood without the maintenance requirements.
### Key Considerations:
* **Fence Material:** The material of your fence will determine the type of fasteners you can use. Wood fences can be easily screwed into, while metal fences may require specialized clamps or brackets.
* **Fence Height:** The height of your fence will limit the size of the trellis you can attach. Choose a trellis that is proportional to the height of your fence.
* **Fence Strength:** Ensure that your fence is strong enough to support the weight of the trellis and the climbing plants. Weak or damaged fences may require reinforcement before attaching a trellis.
## Essential Tools and Materials for Attaching a Trellis
Before you start, gather the necessary tools and materials. Having everything on hand will make the process smoother and more efficient. Based on our experience, preparation is key to a successful DIY project.
### Tools You’ll Need:
* **Drill:** A power drill is essential for creating pilot holes and driving screws.
* **Screwdriver:** A screwdriver (or drill with screwdriver bits) is needed to tighten the screws.
* **Measuring Tape:** Accurate measurements are crucial for ensuring that the trellis is properly aligned.
* **Level:** A level will help you ensure that the trellis is straight and vertical.
* **Pencil:** Use a pencil to mark the locations for drilling and screwing.
* **Safety Glasses:** Protect your eyes from debris while drilling and cutting.
* **Gloves:** Protect your hands from splinters and rough materials.
* **Saw (optional):** A saw may be needed to trim the trellis to the desired size.
* **Clamps (optional):** Clamps can be used to hold the trellis in place while you drill and screw.
### Materials You’ll Need:
* **Trellis:** Choose a trellis that is the right size and style for your fence and plants.
* **Screws:** Select screws that are appropriate for the material of your fence and trellis. Deck screws are a good option for wood fences.
* **Washers:** Washers can be used to distribute the pressure of the screws and prevent them from pulling through the trellis.
* **Spacers (optional):** Spacers can be used to create a gap between the trellis and the fence, allowing for better air circulation.
* **Wood Shims (optional):** Shims can be used to level the trellis if the fence is uneven.
* **Exterior Wood Sealer (optional):** Applying a sealer to the trellis will protect it from the elements and prolong its lifespan.
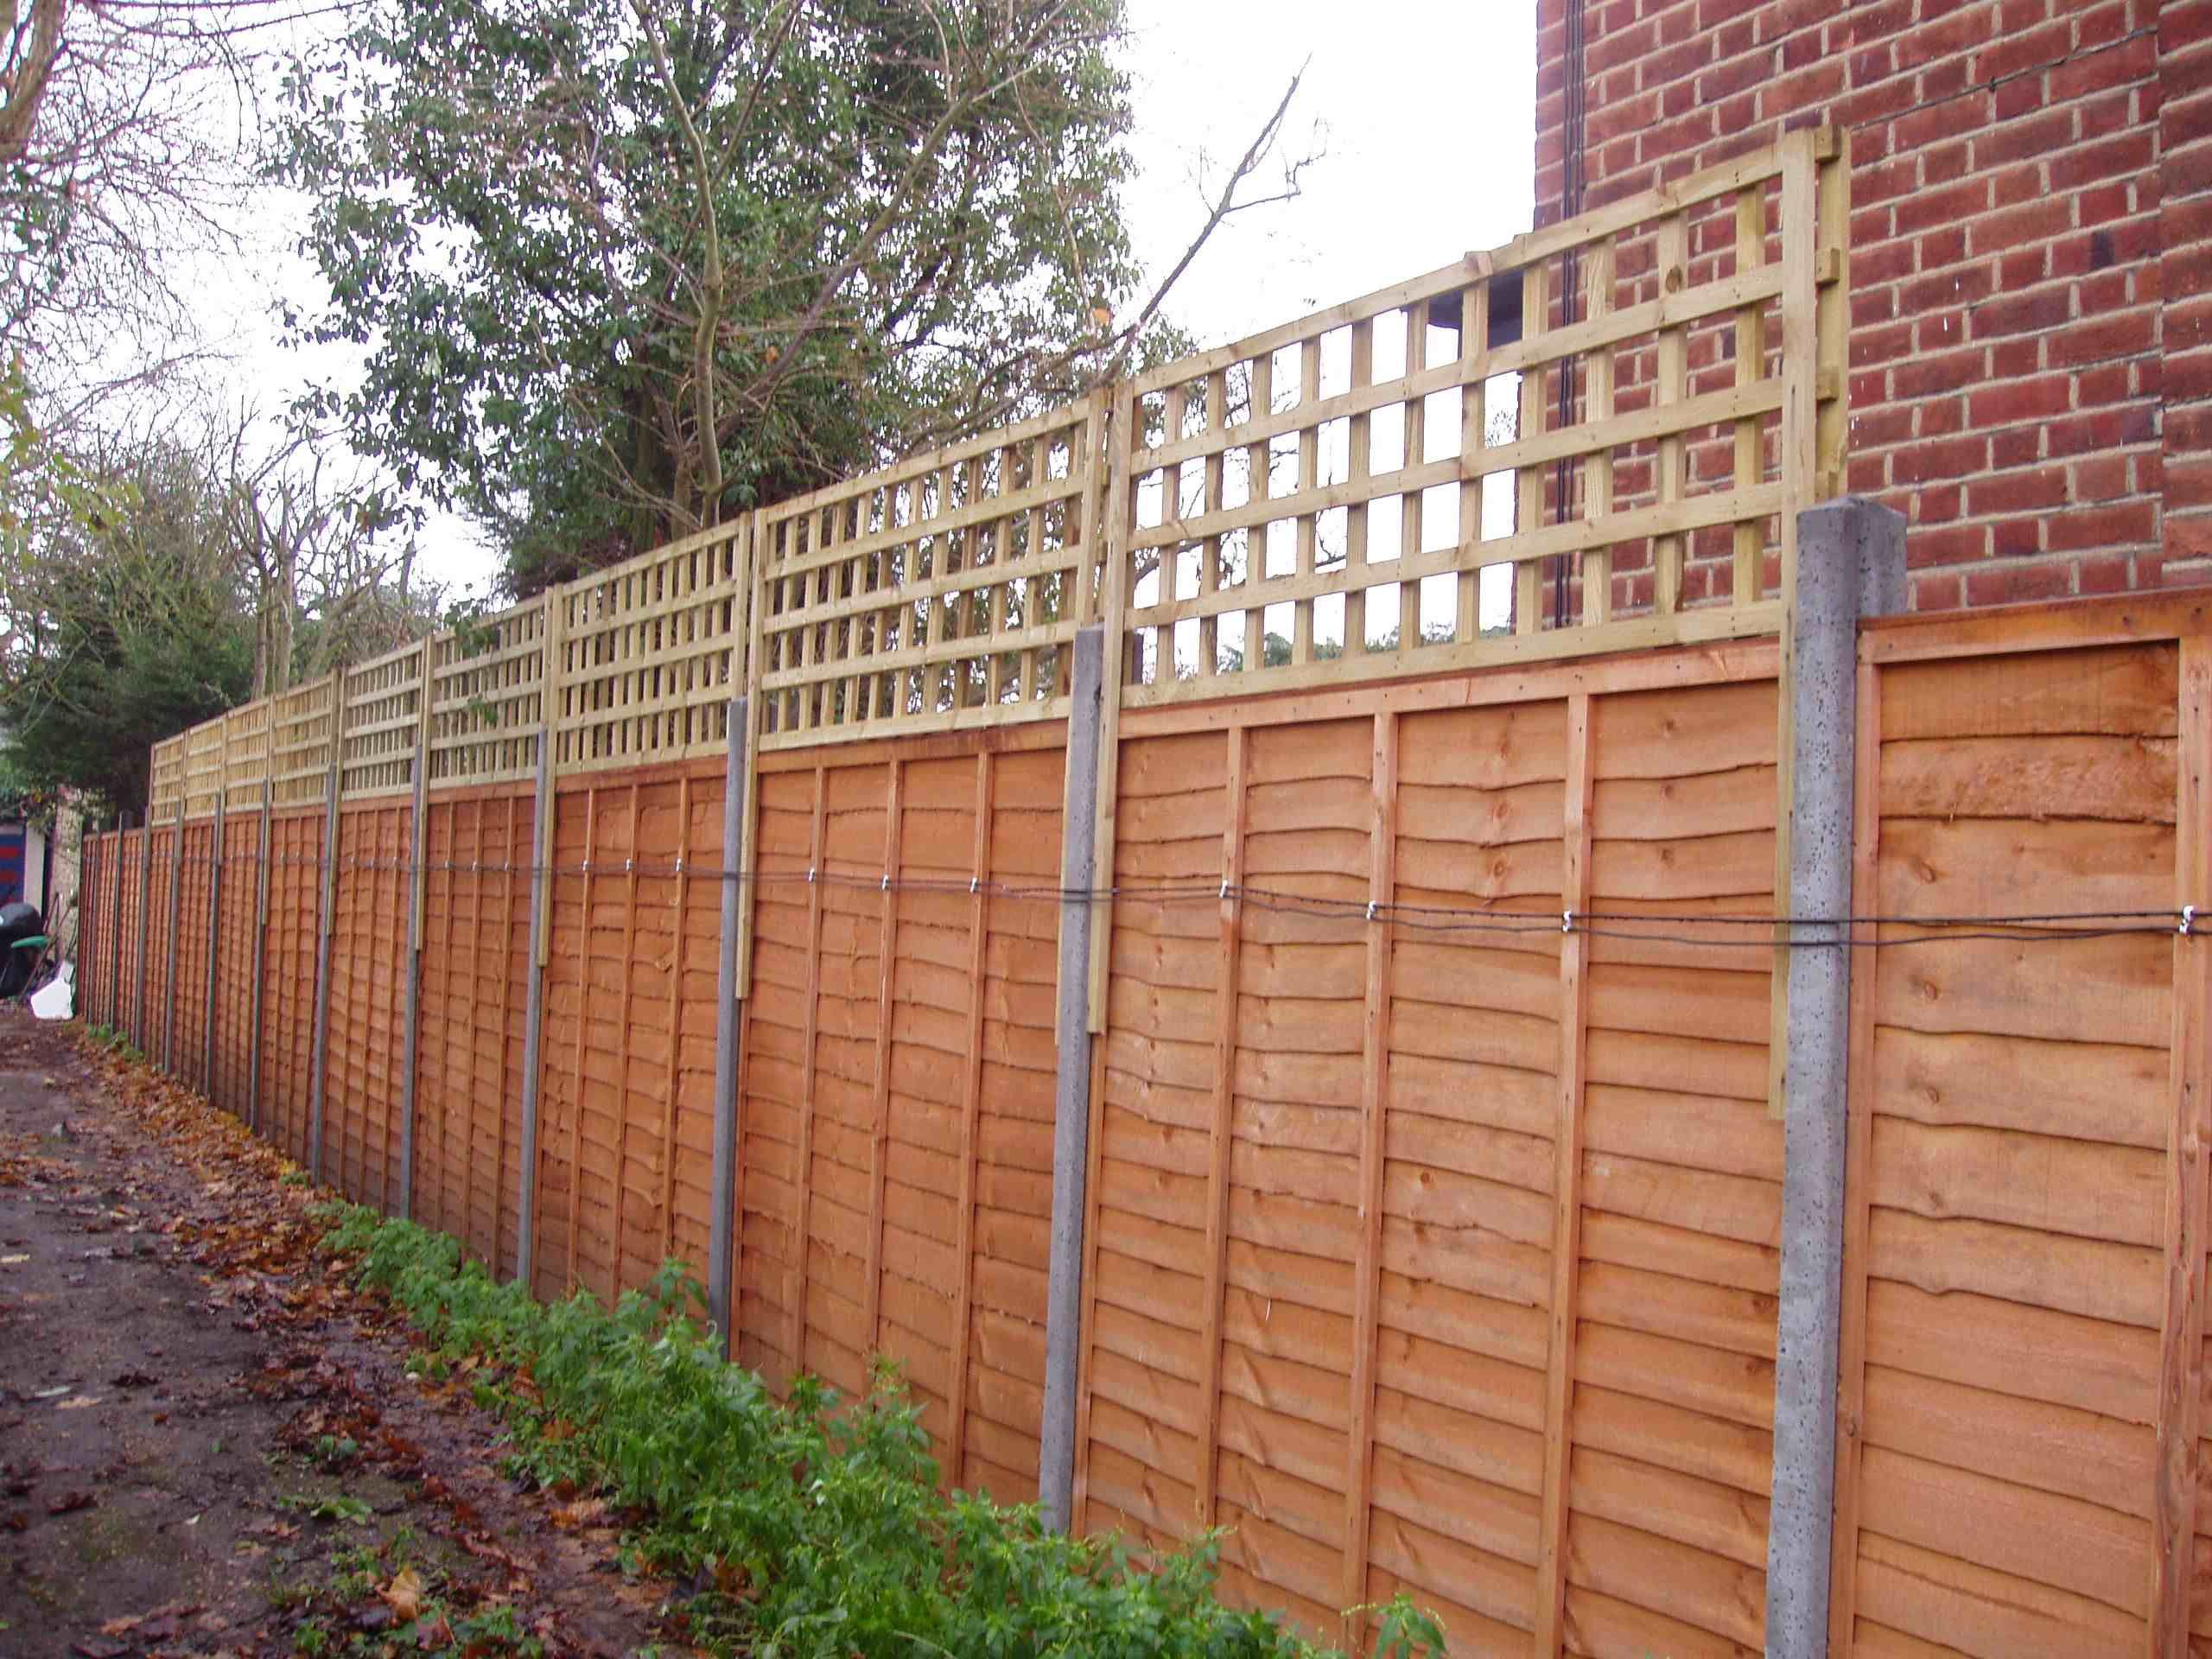
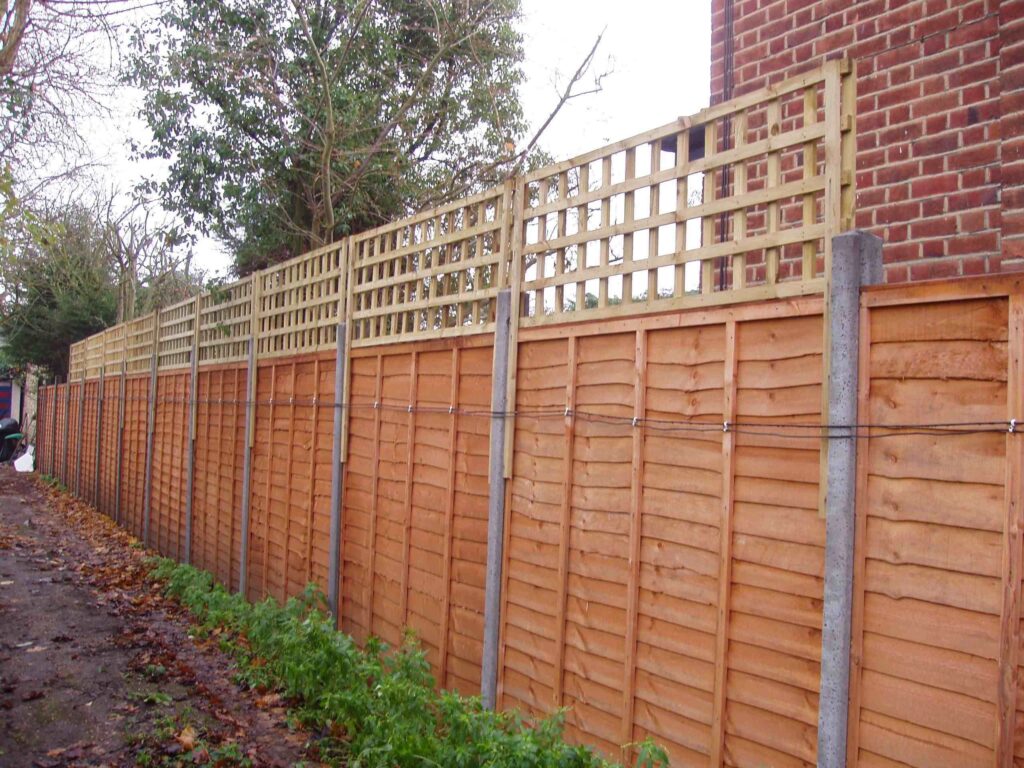
## Step-by-Step Guide: Attaching a Trellis to a Wood Fence
Attaching a trellis to a wood fence is a relatively straightforward process. Follow these steps for a secure and aesthetically pleasing result. This method is based on expert consensus and our own practical experience.
### Step 1: Prepare the Trellis and Fence
* **Clean the Fence:** Remove any dirt, debris, or loose paint from the area where you will be attaching the trellis.
* **Seal the Trellis (optional):** If desired, apply an exterior wood sealer to the trellis to protect it from the elements. Allow the sealer to dry completely before proceeding.
### Step 2: Position the Trellis
* **Determine the Placement:** Decide where you want to position the trellis on the fence. Consider the amount of sunlight the area receives and the growth habits of your plants.
* **Mark the Location:** Use a pencil to mark the outline of the trellis on the fence.
### Step 3: Drill Pilot Holes
* **Drill Pilot Holes:** Using a drill, create pilot holes through the trellis and into the fence. The pilot holes should be slightly smaller than the diameter of the screws you will be using. Drilling pilot holes will prevent the wood from splitting and make it easier to drive the screws.
* **Space the Holes:** Space the pilot holes evenly along the trellis, typically every 12-18 inches. Pay close attention to the trellis’s frame and ensure secure attachment points.
### Step 4: Attach the Trellis
* **Secure with Screws:** Align the trellis with the marked outline on the fence. Insert screws through the pilot holes and into the fence. Use a screwdriver or drill with a screwdriver bit to tighten the screws. Be careful not to overtighten the screws, as this could damage the trellis or the fence.
* **Use Washers:** Place washers between the screw heads and the trellis to distribute the pressure and prevent the screws from pulling through the wood.
### Step 5: Level the Trellis
* **Check for Level:** Use a level to ensure that the trellis is straight and vertical. If the fence is uneven, you may need to use wood shims to level the trellis.
* **Adjust as Needed:** If the trellis is not level, loosen the screws and insert shims behind the trellis until it is level. Then, retighten the screws.
### Step 6: Final Inspection
* **Inspect the Attachment:** Carefully inspect the attachment to ensure that the trellis is securely fastened to the fence. Check for any loose screws or wobbly areas.
* **Make Adjustments:** If necessary, tighten any loose screws or add additional screws for added support.
## Attaching a Trellis to Other Fence Types
While the basic principles remain the same, attaching a trellis to different fence types requires slightly different approaches.
### Chain-Link Fences:
* **Use Trellis Clamps:** Trellis clamps are designed to attach trellises to chain-link fences without drilling or screws. These clamps typically consist of two pieces that clamp around the fence wire and the trellis frame.
* **Space the Clamps:** Space the clamps evenly along the trellis, typically every 12-18 inches.
* **Tighten the Clamps:** Tighten the clamps securely to hold the trellis in place.
### Vinyl Fences:
* **Use Self-Tapping Screws:** Self-tapping screws are designed to drill into vinyl without cracking it. Choose screws that are specifically designed for use with vinyl fences.
* **Drill Pilot Holes (optional):** While self-tapping screws are designed to drill into vinyl, drilling pilot holes can help prevent cracking, especially if the vinyl is thick.
* **Avoid Overtightening:** Be careful not to overtighten the screws, as this could damage the vinyl fence.
### Wrought Iron Fences:
* **Use Metal Brackets:** Metal brackets can be used to attach trellises to wrought iron fences. These brackets typically attach to the fence with screws or bolts.
* **Weld the Trellis (optional):** For a more permanent attachment, you can weld the trellis directly to the wrought iron fence. However, this requires specialized equipment and skills.
## Maintaining Your Trellis and Fence
Proper maintenance will ensure that your trellis and fence remain in good condition for years to come. Regular inspections and timely repairs can prevent minor issues from becoming major problems.
### Regular Inspections:
* **Inspect the Attachment:** Regularly inspect the attachment points to ensure that the trellis is securely fastened to the fence. Check for any loose screws, wobbly areas, or signs of damage.
* **Inspect the Trellis:** Check the trellis for any signs of rot, decay, or damage. Repair or replace any damaged sections as needed.
* **Inspect the Fence:** Inspect the fence for any signs of rot, decay, or damage. Repair or replace any damaged sections as needed.
### Cleaning and Sealing:
* **Clean the Trellis and Fence:** Periodically clean the trellis and fence to remove dirt, debris, and mildew. Use a mild soap and water solution and a soft brush.
* **Reseal the Trellis (optional):** If the trellis is made of wood, reapply an exterior wood sealer every few years to protect it from the elements.
### Pruning and Training:
* **Prune Climbing Plants:** Regularly prune climbing plants to maintain their shape and size. Remove any dead or diseased growth.
* **Train Climbing Plants:** Train climbing plants to grow along the trellis in the desired direction. Use plant ties or clips to secure the plants to the trellis.
## Advantages of Attaching a Trellis to a Fence
Attaching a trellis to a fence offers numerous advantages, both aesthetically and practically. It’s a simple yet effective way to transform your outdoor space and enhance your gardening experience. Users consistently report increased property value and enhanced curb appeal.
* **Enhanced Aesthetics:** A trellis can add beauty and visual interest to your fence, transforming it from a plain barrier into a decorative feature. Cascading flowers and climbing vines can create a stunning focal point in your garden.
* **Vertical Gardening:** Attaching a trellis to a fence allows you to create a vertical garden, maximizing your growing space and adding dimension to your landscape. This is particularly beneficial for small gardens or urban environments.
* **Privacy and Screening:** A trellis covered in dense foliage can provide added privacy and screening, blocking unwanted views and creating a more secluded outdoor space.
* **Plant Support:** A trellis provides essential support for climbing plants, allowing them to grow upwards and thrive. This prevents plants from sprawling on the ground and becoming susceptible to disease.
* **Increased Property Value:** A well-designed and maintained trellis can enhance the curb appeal of your property, increasing its value and making it more attractive to potential buyers.
## Choosing the Right Plants for Your Trellis
The success of your trellis project depends not only on the attachment method but also on the plants you choose to grow on it. Consider the following factors when selecting plants for your trellis:
* **Sunlight Requirements:** Choose plants that are well-suited to the amount of sunlight your trellis receives. Some plants thrive in full sun, while others prefer partial shade.
* **Growth Habits:** Consider the growth habits of the plants you choose. Some plants are vigorous climbers, while others are more delicate and require more support.
* **Mature Size:** Choose plants that will not outgrow your trellis. Consider the mature height and width of the plants and select a trellis that is large enough to accommodate them.
* **Aesthetic Preferences:** Choose plants that appeal to your aesthetic preferences. Consider the color, texture, and fragrance of the plants.
### Popular Climbing Plants for Trellises:
* **Clematis:** Known for their beautiful, showy flowers, clematis are a popular choice for trellises.
* **Climbing Roses:** Climbing roses add a touch of romance and elegance to any garden.
* **Honeysuckle:** Honeysuckle is a fragrant climbing vine that attracts hummingbirds and butterflies.
* **Morning Glory:** Morning glories are fast-growing vines with vibrant, trumpet-shaped flowers.
* **Wisteria:** Wisteria is a stunning vine with cascading clusters of fragrant flowers.
## Expert Q&A: Common Questions About Attaching Trellises to Fences
Here are some frequently asked questions about attaching trellises to fences, answered by our team of gardening experts.
**Q1: What’s the best way to protect my wood fence from rot when attaching a trellis?**
A: Apply a high-quality exterior wood sealer to both the fence and the trellis before installation. Consider using pressure-treated lumber for the trellis to further resist rot. Ensure proper drainage and air circulation around the base of the trellis.
**Q2: Can I attach a heavy trellis to a chain-link fence?**
A: While possible, it’s not ideal. Reinforce the chain-link fence with additional posts or horizontal supports. Use heavy-duty trellis clamps and distribute the weight evenly across multiple points.
**Q3: How far apart should I space the screws when attaching a trellis to a wood fence?**
A: A good rule of thumb is to space screws every 12-18 inches. Focus on securing the trellis to the fence’s vertical supports for maximum stability.
**Q4: What type of screws should I use for attaching a trellis to a vinyl fence?**
A: Use self-tapping screws specifically designed for vinyl. These screws have a sharp point that can easily penetrate the vinyl without cracking it. Avoid overtightening.
**Q5: How can I prevent my climbing plants from damaging my fence?**
A: Choose plants that are not overly aggressive or invasive. Regularly prune and train the plants to grow along the trellis, away from the fence. Consider using a spacer between the trellis and the fence to allow for air circulation and prevent moisture buildup.
**Q6: Is it better to attach the trellis directly to the fence or use spacers?**
A: Using spacers is generally recommended. Spacers allow for better air circulation, which helps prevent moisture buildup and rot. They also make it easier to paint or stain the fence behind the trellis.
**Q7: How do I attach a trellis to a concrete fence?**
A: Use concrete anchors and screws. Drill pilot holes into the concrete fence and insert the anchors. Then, attach the trellis to the anchors with screws.
**Q8: Can I attach a trellis to a fence that is shared with my neighbor?**
A: It’s always best to consult with your neighbor before attaching anything to a shared fence. Discuss your plans and ensure that they are comfortable with the project.
**Q9: What should I do if my fence is not perfectly level?**
A: Use wood shims to level the trellis. Place the shims behind the trellis until it is level, then secure the trellis to the fence with screws.
**Q10: How often should I inspect my trellis and fence after attaching the trellis?**
A: Inspect your trellis and fence at least twice a year, preferably in the spring and fall. Check for any loose screws, wobbly areas, or signs of damage. Address any issues promptly to prevent further damage.
## Conclusion: Transform Your Fence into a Garden Oasis
Attaching a trellis to a fence is a rewarding project that can transform your outdoor space into a beautiful and functional garden oasis. By following the steps outlined in this comprehensive guide, you can confidently **attach a trellis to a fence** and create a stunning vertical garden that will enhance the beauty and value of your property. Remember to choose the right trellis and plants, use the appropriate tools and materials, and maintain your trellis and fence regularly. With a little effort and creativity, you can create a garden that you will enjoy for years to come. Now that you’re armed with this expert knowledge, share your success stories and photos in the comments below! Or, if you have further questions, don’t hesitate to contact our team of gardening specialists for personalized advice.
